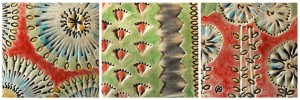
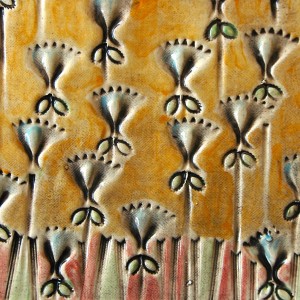
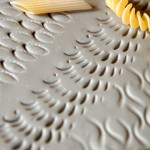
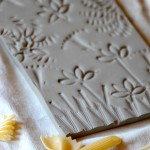
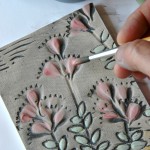
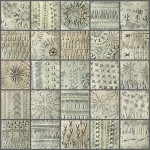
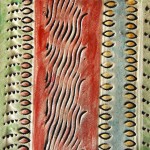
A simple and brilliant idea to be realized at school with clay slabs: colored tiles imprinted with different shapes of pasta. Farfalle, penne, fusilli or spaghetti become interesting tools to create texture on the smooth surface of the fresh clay. You can create abstract designs, patterns or small landscapes … giving space to the imagination. To color the tiles after the first firing I used the Engobes: I applied a layer of black over the entire surface and then I removed it with a damp sponge so that the black color have been left inside of the engraved marks. Then I colored the surface and then brushed the glaze transparent and eventually I proceeded with the second firing.












These are brilliant! What a great idea!
Hi Anne
Actually I make them for the new kitchen of my friend in Bristol, and I thought about food… So, What better than pasta? (Of course, I’m Italian!)
But even for a project with pupils is brilliant! Materials and tools are really cheap, you just need fantasy
Hi Miriam
Can you make these without a firing oven?
Yes, but they will be very fragile. Perhaphs you can do them smaller, like 8x8cm, and 1cm thick, so they’ll be more resistant. You could use acrylic colors, and finally, cover the tiles with a transparent gloss varnish. 🙂
Yes, these are brilliant and interesting. Have you ever tried balloon sculptures for time pass or to amaze your kids? If not then why not give a try to them?
Just lovely, I will definitely be pinning this!
Thanks for a great idea :)Elizabeth
You welcome Elizabeth! Thank you for your pinning!
Love this idea!
Thank you Vicki! I appreciated your comment!
very nice!!
Thank you Mieke, I really enjoyed in making these tiles!!
Love your creativity and would love to try with my elementary school kids.
Any chance you could provide an simple “how to” design appropriate for little ones?
thank you!
Hi Nicole! Do you need simple drawings of the process? I can do it for your children if you tell me what do you need! let me know and I’ll prepare some drawings with every step for you.
Wow! It’s very kind of you to offer Nicole simple drawings of the process to work with kids and if you wouldn’t mind sharing that with me I’d be very grateful as I am a newbie with clay. in case her project is different I’ll be making 2×2″ tiles and then have the kids stamp and decorate them.
Hi Susan! Here you can find the drawing 🙂 http://arteascuola.com/2013/09/instructions-for-tiles-decorated-with-pasta/
Thank you for the drawing tutorial, Miriam! Very very helpful. Great website and love your creative ideas. Was also wondering if decorating with an air dry clay onto a previously fired ceramic tile would adhere permanently with a glue?
I think it could work, depend on the use that you do of the tiles, but if they are just decorative you can use glue.
Thank you, Miriam!
I have tried many of your lessons and LOVE your new website! I am crazy excited to try these pasta tiles! You rock!
Dineen
Westport, CT.
Thank you Dineen, If you’ll try to do the “pasta tiles”, please show me your work!
I forgot to order the engobe (sp?) glazes but am going to because I see you are a big fan of it and i really like their look.
I will definitely show you.
I admit to be a big fan of engobe colors… they are so brilliant, and I love paint my ceramics rather than simply glaze them 🙂
love this project
Thank for your comment, I’m very proud of this project because it’s so simple!!
Hi Miriam,
I love this project! I would love to do this with my primary school students. I noticed you offered Nicole some drawings as to simplify it for younger students. Would you mind sending that my way as well?
Many thanks!!!
Hi jampimwolf,
thanks for your comment, I’ll prepare the drawing for you and Nicole as soon as possible!
Very cool! What is the thickness of the clay after rolling?
The thickness of the clay is about 8mm and the size of the tile is 15x15cm, but I think you can work with 1 cm thickness as well 🙂
Wow. What a terrific idea for stamping. I’ve been doing clay for 40+ years and never, ever thought of using pasta for stamping. Did it this week with my students and they loved all the geometric and flower garden designs they could make. We all look forward to the firing and then adding engobe & underglazes! Thank you so much!!
Hi Tina! It is an honor to know a person with so much experience in matters of ceramic! I still have so many things to learn… I’m very glad to meet you on the web, perhaps you have got a web site where I could see your works! Thanks for your comment Tina, this was one of those ideas so simple that sometimes illuminate our work!
great project, did you fire them with the pasta still in? Thanks!
Hi Denise! The pasta is just for the imprinting in the fresh clay… I’m Italian and I know very well how cook pasta 😉 Thanks for your comment!
so it all had to be picked out before firing?
Thanks again!
Yes, the pasta is used just to imprint the shape into the soft clay. Then you wait that the clay is completely dry, and after that you can fire the tiles. This is just the first fire, subsequently you decorate and glaze the tiles and they will be ready for the second fire. Have a look at evry picture of the gallery, if you have other questions, please contact me again!
Thanks for the great idea, I am trying it this coming week with my students (7 and 8 years old), I’ll put the photos on my FB ‘Manu Alfarero’
Hi Manu! I’m sure that they’ll enjoy this work! I’m curious to see your tiles!
what a super awesome idea !! im going to try this asap…just one thing…i dont have the facilities to fire the tile….any suggestion??…thanks :))
Hi Vandana! You can try, but the tiles will be too fragile without firing! You should try with synthetic clay (DAS Air Drying Modelling Clay) which will air harden. Do you know any product like this?
brilliant!! Absolutely love it!! congratulations!
Hi Agnes! Thanks for your comment 😉
Would it be possible to do this project with air dry clay?
Hi Heather, yes, I think would be possible to do it with air dry clay like Das, and you can color it with acrylic painting. If you try to do the project tell me how is the result!
A great idea! They are beautiful, thank you!
Hi Pat! Nice to meet you, I hope you find useful suggestion in my website! Keep in touch! 😉
What a great idea! I can’t wait to try it with my kids…
Hi Cathy! Of course they’ll enjoy the project! 🙂
Beautiful and inspiring!
Thank you Beth!! 🙂
This is a fabulous idea as it stands. I am wondering if you think this technique could be used to create simple printing plates out of clay? Would they still have to fired? or could one ink the clay right away?
Hi! I think is possible to create printing plates out of clay. The only problem is that the raw clay is very fragile. Perhaps if the plates are small you can do it and even paint the surface. You have to try some sample. There is a soft material which hardens on contact with the air, is a sort of “artificial” clay created for school and children. You can mold it for some hours and then it become hard in a night. In Italy we call it DAS, but I don’t know if you can find it because is an italian product (where are you from?). It’ possible to paint it as well when is hard. Let me know if you find something similar or if you can do it with clay.
http://www.fila.it/en/das/products/modelling-clay
🙂
Thank you for taking the time to answer my question. I am in the US. We do have a type of air dry clay like the one you suggested and I happened to have some on hand. Yay! I rolled it to 1/4″ (6mm), made my imprints and let it dry overnight. The resulting tile was somewhat fragile but produced a fabulous print if I gently used my hand to press the paper. I wouldn’t do this with a very young group but I think the older kids could do it fine. Thank you again for the inspiration!
Wow! You do a great job! Thanks to you for the new idea about printing the tiles on paper! When you do that you may send me some pictures of the process step by step, I could dedicate a post to you and your kids! 🙂
Did you make the clay homemade and do you have the how to do list ?
Hi Katherine! I bought the clay in a shop, and my “how to do ” list is in this simple drawing you can fin here http://arteascuola.com/2013/09/instructions-for-tiles-decorated-with-pasta/
let me know if you need any further information 🙂
I am an elementary art teacher and would love to try this. Terrific way to introduce concepts of pattern and texture with clay. What is engobe glaze? Is there something I could substitute? I have regular low fire glazes, underglazes and clear glaze. What works best for the black in the crevices? I also do an impressed leaf dish with fourth graders in the fall. This would be a great way to decorate and glaze these.
Thanks for your inspiration.
Hi Gwen! Engobe is a sort of colored slip clay, it cooks at the same temperature as the clay! But I think you may use black underglaze as well. Even the colors are in colored slip clay, but the colored underglaze will be great! After the first fire you can use clear glaze. 🙂
Oh. Thank you very much. I can’t wait to try this!
Thanks for your comment Gwen! 🙂 you’ll enjoy it!
Thanks for sharing! 🙂
thanks for sharing! 😉
love these, thank you for posting. I also have sets of “watercolor” glazes; come in a watercolor style container with ovals of color.
Hi Davis! thanks for sharing your suggestion. I don’t know these colors like watercolors, I think could be an interesting items using at school with kids. Where did you find it? I’m living in Italy and in my region is not so easy to find good items for ceramic! 🙂
thanks for the link! 🙂
thanks for sharing! 🙂
Thanks for the link in your great website! 🙂
great idea!! love the colors! A question can it be done also with Fimo clay??
Hi Jeanine! I think it can be done also with fimo clay, but I don’t know if you can color it and which material you could use for color the tiles. Fimo is already colored with bright colors, so you could just do the imprinted decoration with pasta, or you could use acrylic paint on the surface when fimo is fired. 🙂
Hi Shawl, I think you can use your glaze, the effect could be different because the engobe is opaque and it needs a second fire with transparent glaze to become shiny, but at the end it will be similar.
Hello. I was wondering how you use or make Engobes? Can something be substituted? I have glazes and underglazes and clear. Secondly, when you added colour after the black sponge off, were those underglazes or glazes? Thanks!
Hi Merlin, the engobes are a sort of colored clay, but underglazes colors will be perfect for this kind of decoration. You could use underglaze in the first fire and then glaze the tile with clear in the second fire. Engobes work more or less as underglaze, you can paint the clay when it’s leather hardness and fire the first time or use it after the first fire. Let me know if you need some any further suggestion. 🙂
Hy what a beautifull work,what kind of clay did you use ?
It is white clay, but you can use every kind of clay in slabs. 🙂